Git and GitHub for Beginners: From First Commit to Team Workflow
Git is a version-control tool on your computer; GitHub is the cloud home where your repositories live and teams collaborate.
The core loop is three commands: git add (pack), git commit (seal), git push (ship to GitHub).
Branches let you edit a safe copy; pull requests let a team review and merge that copy into main.
This guide follows one real practice repository from empty folder to merged pull request, with real terminal output.
Every common beginner error is listed with its exact fix, including the ones we made ourselves while writing this.
Team note: In college we once lost a full mini-project because the “final_final_v3_REAL.zip” folder got overwritten at 2 AM. No backup, no history, no recovery. Git exists so that story never happens again. Everything in this guide was done live on a real repository while writing it, errors included.
Git vs GitHub: The Difference Everyone Mixes Up
People use the two names like synonyms, and that confusion blocks everything after it. Separate them once, forever:
Git is a tool installed on your computer. It records the history of your files: every save point, every change, every undo. It works fully offline.
GitHub is a website. It stores copies of your Git repositories in the cloud so you can share them, back them up, and work as a team.
The analogy we use with every intern: Git is the camera that photographs your code after every meaningful change. GitHub is the shared cloud album where the whole team can see those photos and add their own.
Point | Git | GitHub |
What it is | Version-control software on your machine | Cloud platform for hosting repositories |
Works offline? | Yes, completely | No, it is a website |
Main job | Track history, enable undo and branching | Backup, sharing, pull requests, team review |
Alternatives | None really; Git is the standard | GitLab, Bitbucket |
Why Every Intern Must Know This Before Day One
No more final_v3.zip: history replaces chaotic copy-paste backups
Safe experiments: break things on a branch, main stays untouched
Team work: five people, one project, no overwritten files
Instant undo: any bad change can be rolled back in seconds
Proof of work: your contribution graph is a living resume recruiters actually check
Install Git and Prove It Works
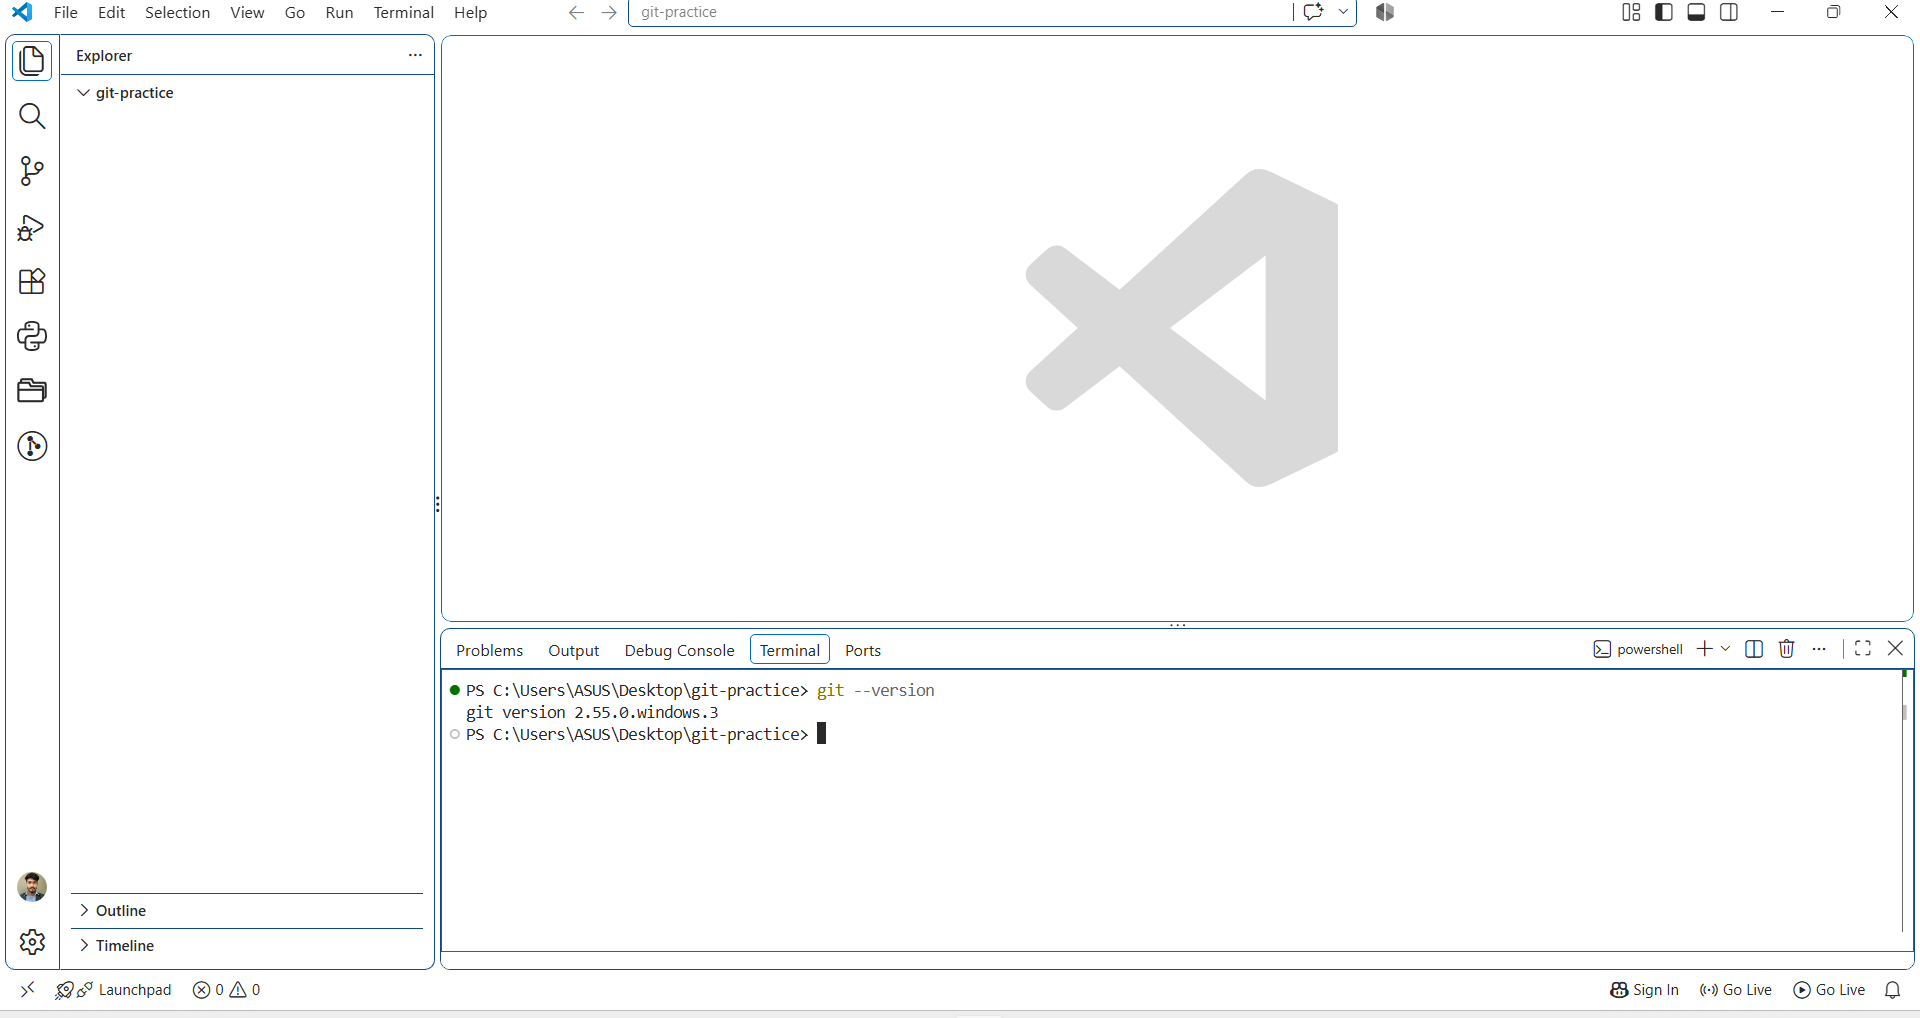
Download Git from the official site, install with all default options (just keep pressing Next), then open VS Code, open your project folder, and open the terminal from Terminal → New Terminal. Type this and press Enter:
git --version
A line like git version 2.55.0.windows.3 means Git is alive on your machine. If instead you see “git is not recognized”, Git is either not installed or VS Code was open during installation — install it or restart VS Code and try again.
Now introduce yourself to Git once, so every commit carries your name:
git config user.name "your-name"
git config user.email "your-email@example.com"
The Three-Zone Mental Model: Understand This, Understand Git
Most Git confusion disappears once you see there are three places your code can sit, and only two doors between them:
flowchart TD
    A[Working Directory: your files as they are now] -->|git add| B[Staging Area: packed and ready]
    B -->|git commit| C[Local Repository: sealed history]
    C -->|git push| D[GitHub: cloud copy for the team]
Use the moving-house analogy. git add puts items into boxes. git commit seals the boxes and writes a label on them. git push loads the sealed boxes onto the truck and sends them to the storage warehouse, which is GitHub. Until you push, everything lives only on your laptop.
Your First Commit, Exactly As We Did It
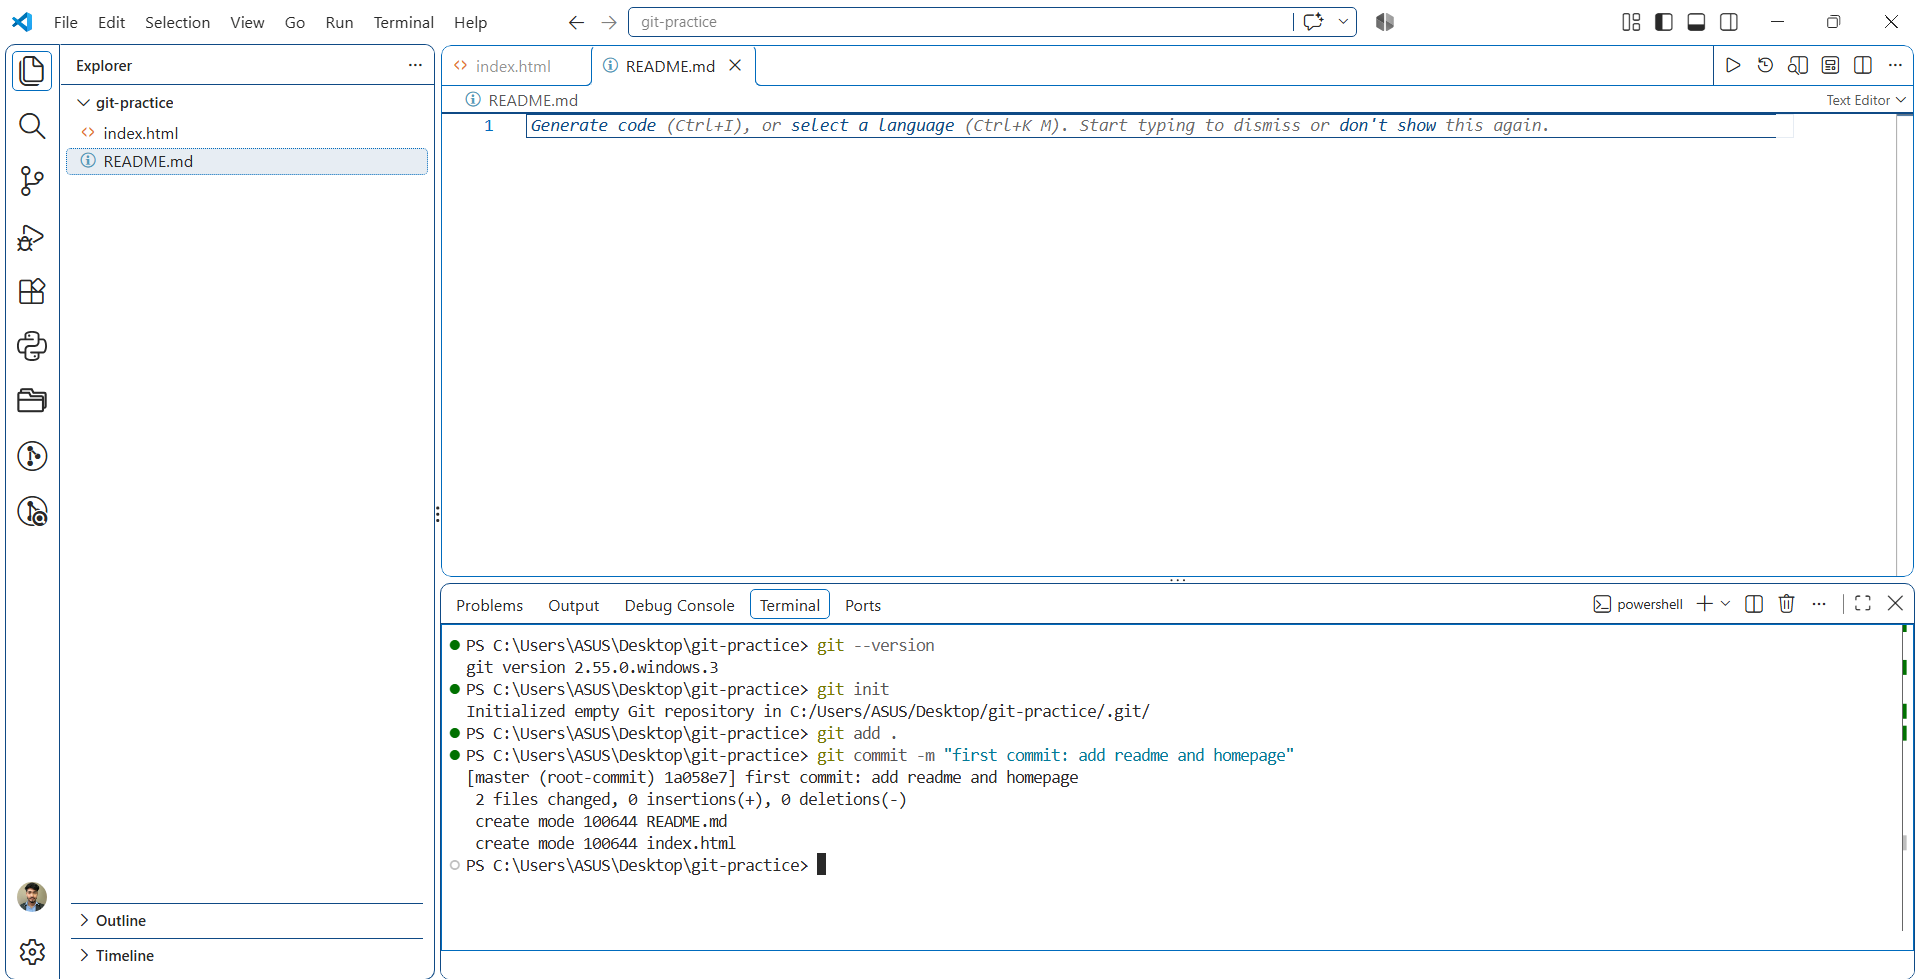
We created a folder named git-practice with two files: README.md and index.html. Then, in the VS Code terminal inside that folder:
git init
git add .
git commit -m "first commit: add readme and homepage"
git init wakes Git up inside this folder. Output: “Initialized empty Git repository in …”. A hidden .git folder appears; that is the diary.
git add . stages every changed file. The dot means “everything here”. No output means success.
git commit -m "..." seals the stage into history with a message. Output shows the commit id and “2 files changed”.
Commit Messages: Small Habit, Big Reputation
Your commit message is a note to the future, including future-you at 1 AM debugging. Compare:
Bad: “fix”, “update”, “asdf”, “final final”
Good: “add about section”, “fix navbar overlap on mobile”, “rename price column to price_rs”
Rule we teach interns: one commit, one clear change, one sentence that starts with a verb. Reviewers can read your history like a story, and that story is part of your professional image.
.gitignore: The Bouncer of Your Repository
Some files should never enter history: dependency folders, build junk, and above all secrets. A file named .gitignore lists what Git must ignore.
node_modules/
.env
*.log
dist/
Non-negotiable rule: never commit passwords, API keys, or .env files. Public repositories are crawled by bots within minutes. A leaked key has cost real companies real money, and it is the fastest way to fail a technical interview task.
Step 1 Problems List: What Breaks Here and the Exact Fix
Problem | Why It Happens | Exact Fix |
“git is not recognized” | Git not installed, or VS Code open during install | Install from git-scm.com, restart VS Code fully |
“Please tell me who you are” | Name and email not configured yet | Run the two git config commands above, retry commit |
“nothing to commit, working tree clean” | No file changed since last commit, or wrong folder | Edit and save a file first; check you are inside the project folder |
Red PowerShell error about & character | HTML or file content typed into terminal by mistake | File content goes in the editor; terminal takes commands only |
Folder accidentally named after a command | Command typed into folder-name box instead of terminal | Delete that folder; commands live only in the terminal panel |
CRLF/LF warning lines | Windows and Unix line-ending difference | Ignore it; it is a warning, not an error |
Yes, we did both silly ones: while writing this guide we personally created a folder named after a command and pasted an HTML line into the terminal. Neither broke anything. Git forgives beginners; it only punishes those who quit.
You now own the local side of Git: install, identity, three zones, first commit, and the bouncer file. The next part crosses the network: creating a GitHub repository, connecting it with remote add, pushing your first code to the cloud, then the real team ritual — branches, pull requests, and merges — exactly as we performed them on our practice repository.
From Laptop to Cloud: Creating the GitHub Repository
Your commits so far live only inside your laptop’s hidden .git folder. If the laptop dies tonight, the history dies with it. The repository on GitHub is the cloud home that ends that fear.
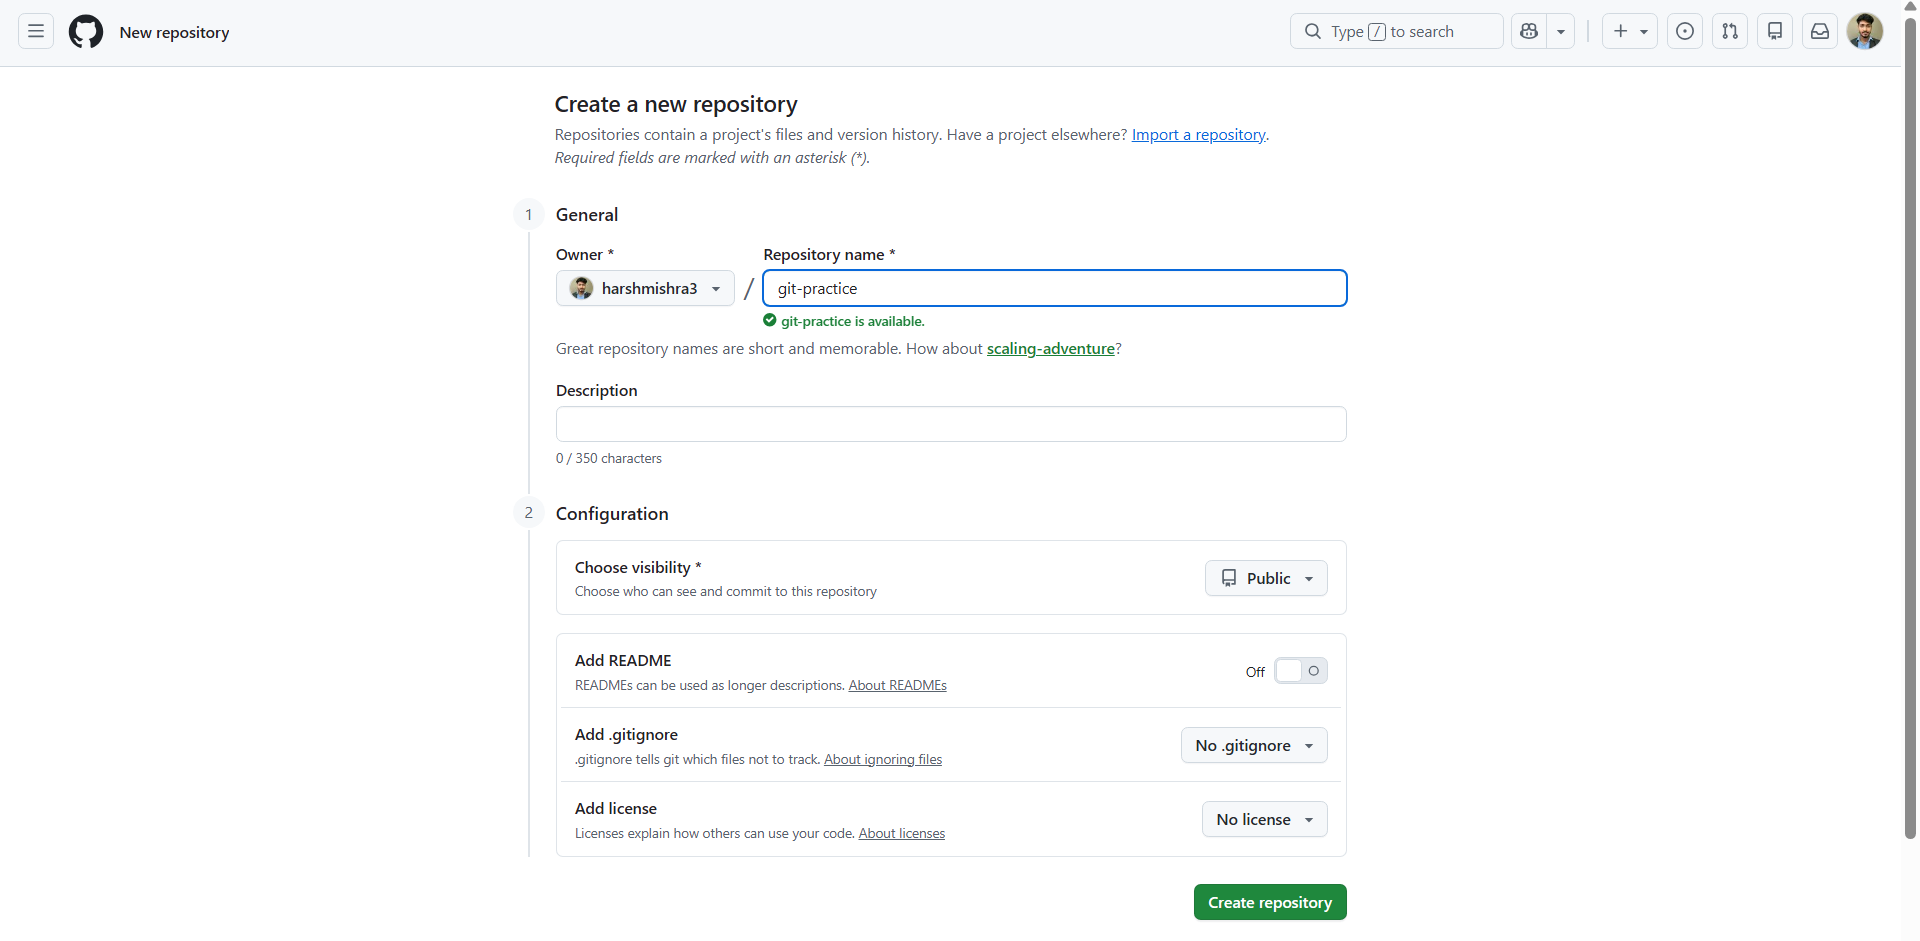
On GitHub, click the plus icon at the top right and choose New repository
Give it the same name as your folder, in our case git-practice
Keep it Public so it can double as portfolio proof
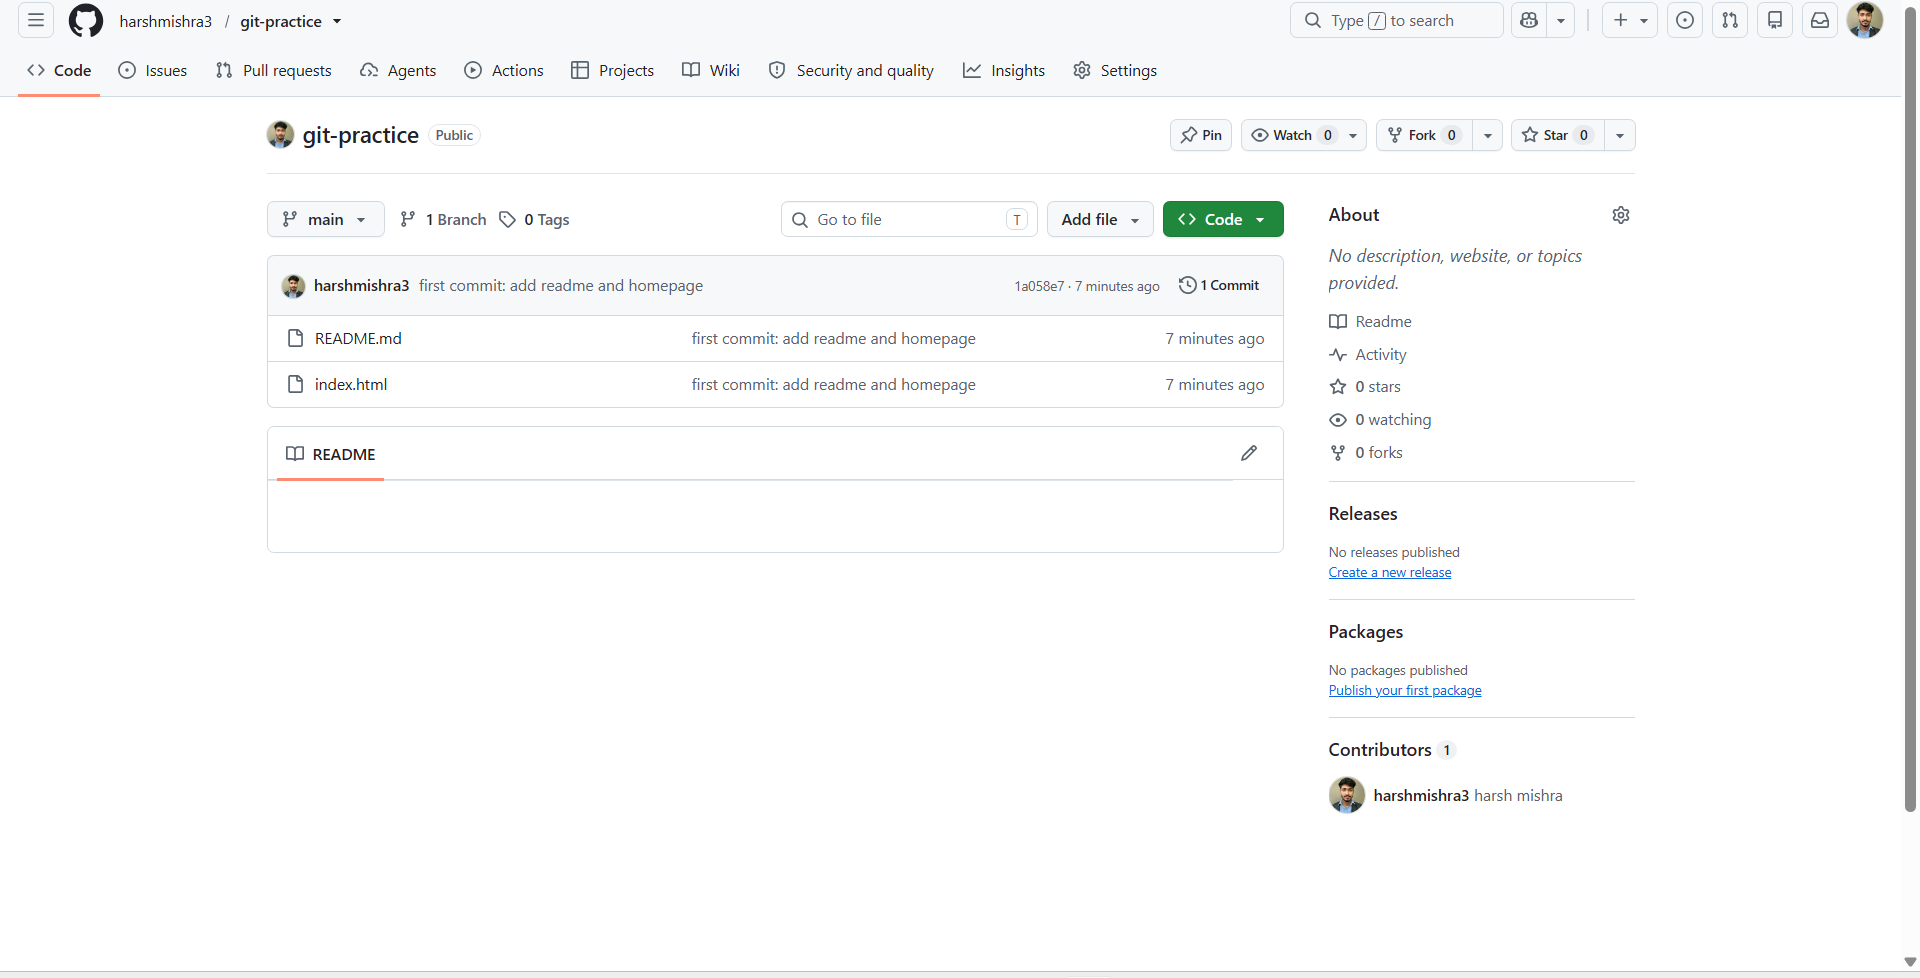
Leave “Add a README file” unticked. This matters: a repo born with files will refuse your first push, and beginners lose an hour to that refusal.
After creation, GitHub shows a “Quick setup” page full of commands. Do not panic-read it. You only need two of those lines, and we will type them with understanding, not copy-paste blindness.
Connecting Folder and Repo: The Remote Handshake
Git needs to learn the address of your cloud home. That address gets a nickname: origin, meaning “the original place this project lives in the cloud”.
git branch -M main
git remote add origin https://github.com/your-username/git-practice.git
The first line deserves a story. Older Git versions name your default branch master; modern convention is main. Our own first commit proudly announced “[master …]”, and one line renamed it. If your terminal ever shows master, you now know it is just an old default, not a mistake.
Push: The Moment Your Code Goes Public
git push -u origin main
push uploads your committed history to GitHub
-u (upstream) links your local main to the cloud main, so future pushes need only
git pushA browser window may open asking you to sign in and authorize. That is Git’s credential manager doing its job; allow it once.
Then do what every developer on earth does: refresh the repo page. Seeing your own files sitting on github.com, with your commit message beside them, is a small quiet joy. Ours took three refreshes because we did not believe it the first time.
Branches: Edit a Photocopy, Never the Original
In teams, nobody edits main directly. Main is the clean, working version. Every change happens on a branch: a parallel copy of the project where you can break things freely.
git checkout -b feature-about
# edit index.html in the editor, then save
git add .
git commit -m "add about section"
git push -u origin feature-about
checkout -b creates the branch and switches you onto it in one step
VS Code shows your current branch at the bottom left; glance at it before every commit, always
Editing happens in the editor, never in the terminal. We learned this by pasting an HTML line into PowerShell and receiving a wall of red text about ampersands.
“fatal: a branch named … already exists”: this only means you created it earlier and forgot. Check the bottom-left branch name; if you are already on it, skip creation and continue editing. Nothing is broken.
Pull Request: The Heartbeat of Team Work
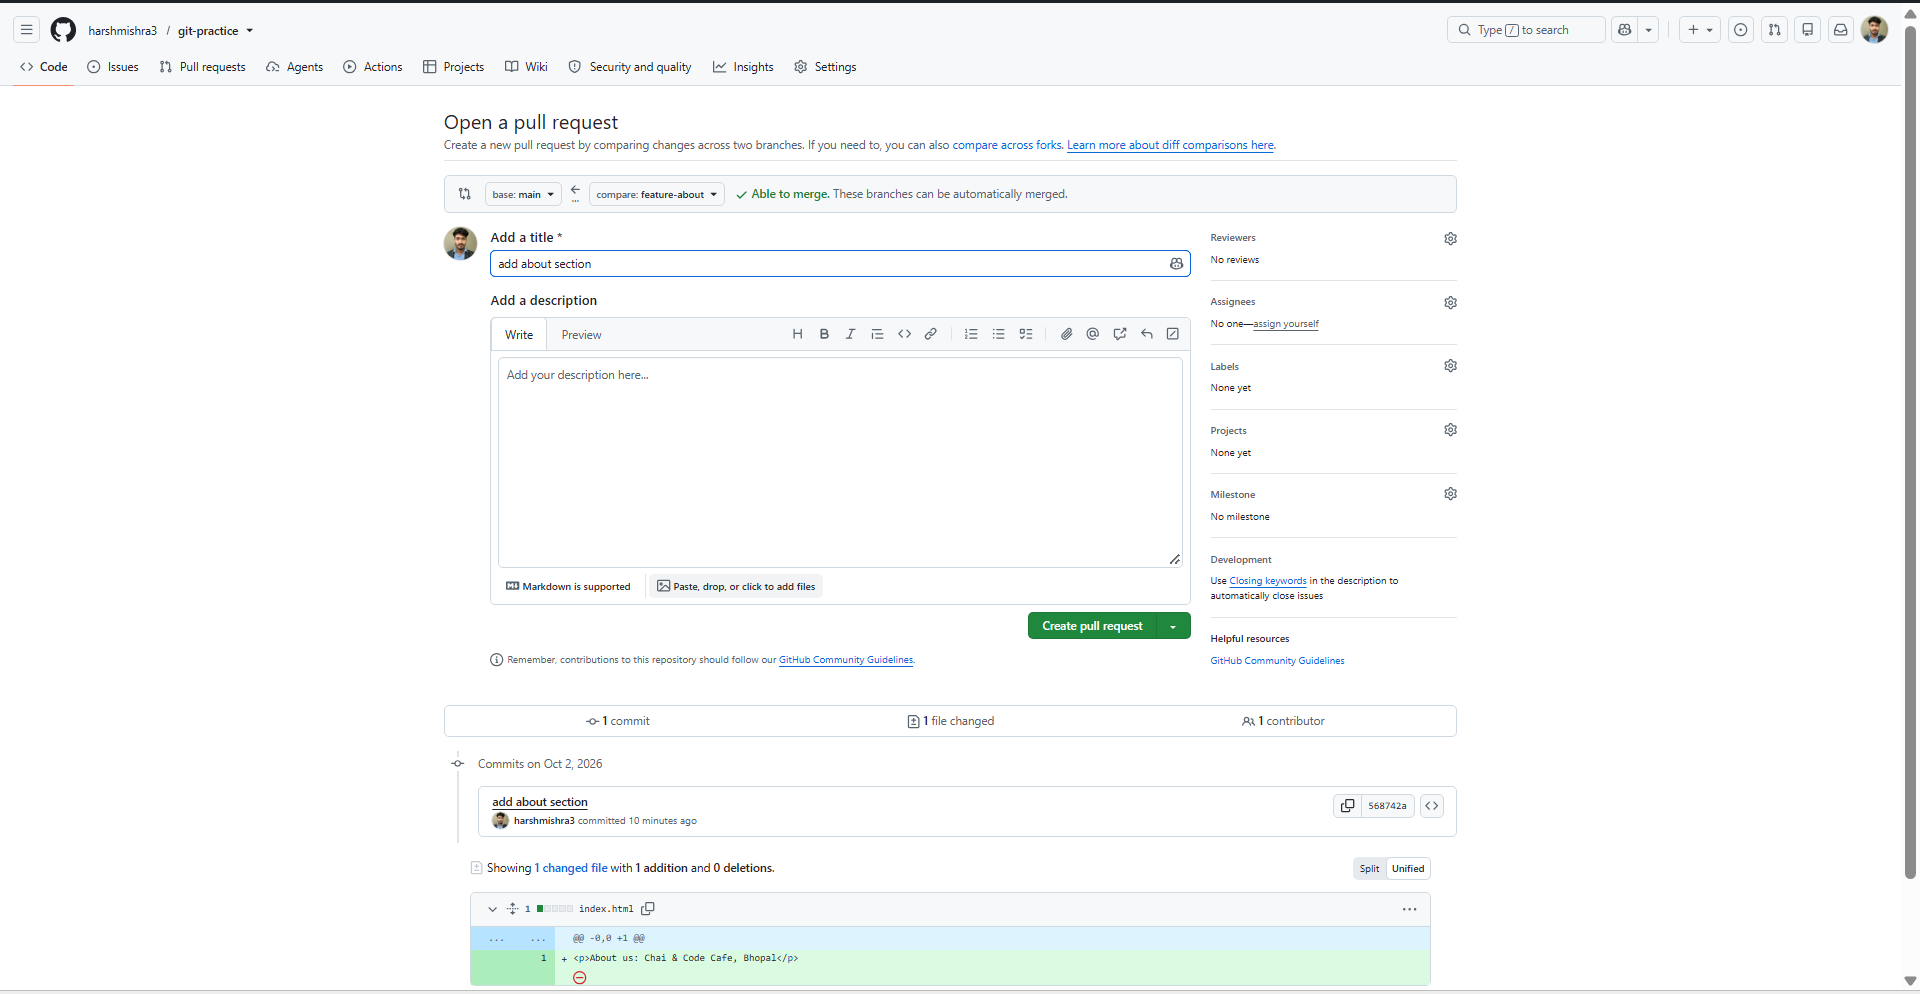
A pull request, or PR, is not a Git command. It is a conversation page on GitHub where you say: “I made these changes on my branch; please review and pull them into main.”
After pushing a branch, the repo page shows a green banner: “feature-about had recent pushes” with a Compare & pull request button
The PR page shows base: main ← compare: feature-about, meaning changes flow from your branch into main
The diff shows exactly what changes: added lines in green, removed lines in red. Read your own diff before asking anyone else to.
Internship truth: your first PR at a company will come back with comments. That is not rejection; that is training. Every senior developer you admire has a history of PRs full of review comments. A PR with zero comments forever usually means nobody is reading, which is worse.
Merge: Making the Change Official
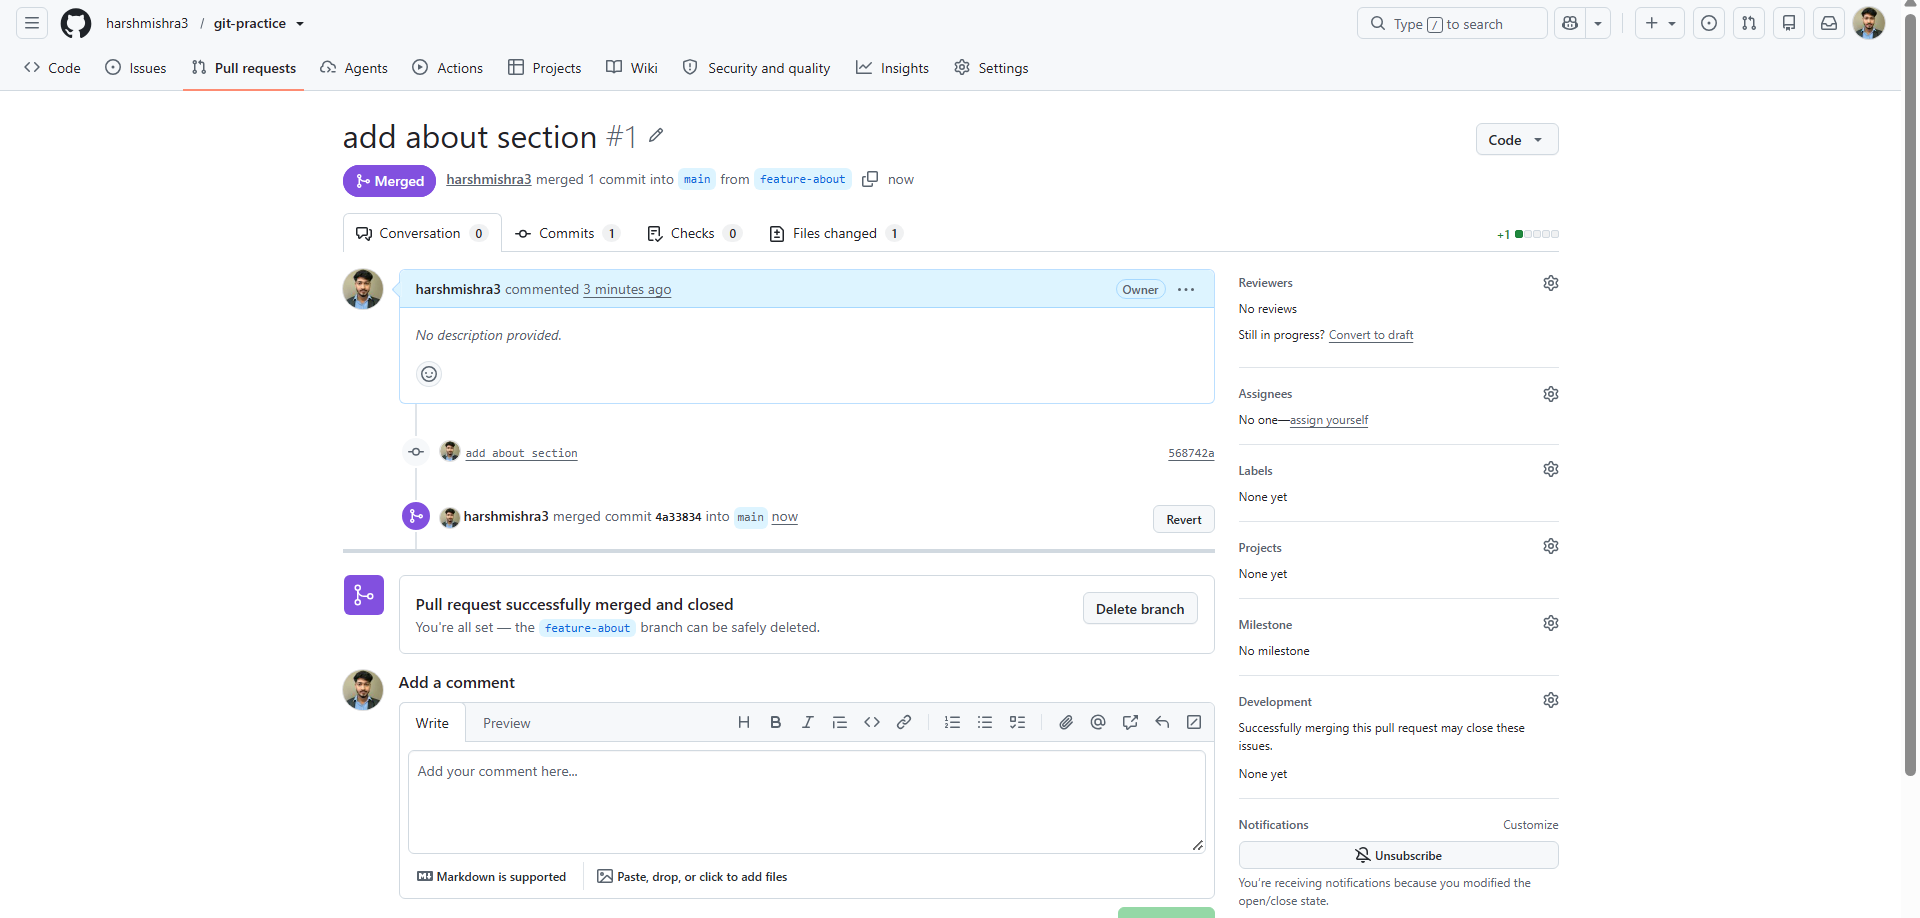
On the PR page, the green Merge pull request button, followed by Confirm merge, copies your branch’s changes into main permanently. GitHub then shows the line every contributor loves:
Pull request successfully merged and closed.
Optionally delete the branch afterwards; its job is done and teams keep branch lists tidy. Then visit index.html on main and see your About line living in the official version. That loop — branch, commit, push, PR, merge — is the exact loop you will repeat hundreds of times in your career.
Clone and Pull: Getting Team Code Onto Your Machine
So far you pushed your own project. In a team, you start from someone else’s repository. Two commands cover everything:
# first time only: download the whole repo
git clone https://github.com/team/project.git

# every day after: bring new changes into your copy
git pull
clone downloads a repository plus its full history, once
pull updates your local copy with new commits from the cloud
fork (GitHub-side, not a Git command) creates your own cloud copy of someone else’s repo, used for open-source contributions
Step 2 Problems List: What Breaks Here and the Exact Fix
Problem | Why It Happens | Exact Fix |
Push rejected: “failed to push some refs” | Repo was created with a README, so cloud has a commit you lack | git pull --rebase origin main, then push; next time create empty repo |
“src refspec main does not match any” | Local branch is still named master | git branch -M main, then push again |
“remote origin already exists” | remote add typed twice | git remote set-url origin <url> to correct it |
Login window keeps reappearing on push | Credentials not saved by credential manager | Complete browser sign-in fully once; restart VS Code if it loops |
Committed on the wrong branch | Did not glance at bottom-left branch name | Stay calm; move or redo commits later, or fix via a new PR |
PR says “can’t automatically merge” | Both branches edited the same lines: a conflict | That is Step 3’s territory; it is simpler than its reputation |
You can now create, connect, push, branch, request, and merge — the complete team loop. The final part handles the moments that scare beginners most: merge conflicts, undoing mistakes safely, the daily command cheat-sheet, and how your GitHub profile quietly becomes your career proof.
Merge Conflicts: Scary Name, Simple Reality
A conflict happens when two branches edit the same lines of the same file, and Git refuses to guess which version you want. That refusal is not an error. It is Git doing the responsible thing: asking a human to decide.
When it happens, the file itself shows you the argument, with markers that look like this:
<<<<<<< HEAD
<p>About us: Chai & Code Cafe, Bhopal</p>
=======
<p>About us: Coming soon in Indore</p>
>>>>>>> feature-indore
<p>About us: Chai & Code Cafe, Bhopal. Coming soon in Indore.</p>
Read it slowly and it is almost friendly. Above the ======= line is your current branch’s version. Below it is the incoming branch’s version. The ugly arrows are just fences. Resolving a conflict is four steps:
Open the file and read both versions
Edit until the file says exactly what you want (keep one, keep the other, or combine both)
Delete all marker lines: the arrows and the equals signs
Save, then
git addthe file and commit to finish the merge
First conflict memory: ours was a single line in a footer, and we still remember the heartbeat spike when the markers appeared. Ten minutes later we realized Git had not broken anything; it had simply said “both of you edited this, you choose”. Every conflict since has felt like a form filling.
The Undo Toolkit: Five Commands That Save Careers
Beginners fear Git because they think mistakes are permanent. They are not. Git is a time machine, and here are the five buttons on its control panel:
Situation | Command | What It Does |
File messed up, not committed yet | git restore filename | Throws away uncommitted edits, back to last commit |
Committed, but want to un-commit and keep edits | git reset --soft HEAD~1 | Removes last commit, changes return to staging |
Bad commit already pushed to team | git revert commit-id | Adds a new commit that undoes it; history stays honest |
Half-finished work, urgent task arrived | git stash, later git stash pop | Shelves your changes safely, returns them later |
Confused about what is going on | git status and git log --oneline | Shows pending changes and recent history, anytime |
The one dangerous button: git reset --hard destroys uncommitted work with no recovery. Seniors use it rarely and carefully. As a beginner, treat it like a fire extinguisher: know it exists, hope to never need it, never pull it casually.
The Daily Cheat-Sheet You Will Use Forever
Command | Plain Meaning |
git status | What changed since last commit? |
git add . | Stage everything changed |
git commit -m "msg" | Seal staged changes with a message |
git push | Send commits to GitHub |
git pull | Bring team’s new commits to you |
git checkout -b name | Create and switch to a new branch |
git branch | List branches, star on current one |
git log --oneline | Compact history of commits |
git clone url | Download a repo with full history |
git stash / git stash pop | Shelve work temporarily, restore it later |
Your Internship Git Routine: Six Habits From Day One
Start With Pull
git pull before touching anything.
Branch Per Task
New task, new branch, always.
Small Commits
One change, one clear message.
Push Your Branch
Never work only on your laptop.
Open the PR
Describe what and why, briefly.
Clean After Merge
Delete branch, pull main again.
Beginner Mistakes That Announce “New Here” in Reviews
Mistake | Why It Hurts | Habit Instead |
Committing straight to main in a team repo | Bypasses review, risks breaking shared code | Branch, then PR, every single time |
One giant “everything” commit at week’s end | Impossible to review or undo partially | Commit after each finished small change |
Never running git status | Committing secrets or junk by accident | status before every add, read the list |
Not pulling for days | Conflict explosion when you finally merge | Pull every morning, small pain daily |
Copy-pasting commands without reading | Wrong branch, wrong repo, wrong day | Read each command once before Enter |
Empty PR descriptions | Reviewers guess instead of reviewing | Two lines: what changed, why it changed |
Your GitHub Profile: The Silent Resume
Recruiters and internship mentors do open candidate profiles. What they actually look at is simpler than you think:
Consistency: a contribution graph with regular activity beats one week of hundred commits
Real repositories: pinned projects with a README that explains what and why
Sensible history: commit messages that read like sentences, not “asdf fix”
Team signals: pull requests and reviews show you can work with humans
The practice repository you built in this guide already counts. It has commits, a branch, a merged pull request — the exact artifacts a reviewer hopes to see from a beginner.
🎯 Key Takeaways
Git tracks history on your machine; GitHub hosts and shares that history in the cloud.
The daily loop is pull, branch, commit, push, PR, merge — in that order, forever.
Staging, committing, and pushing are three separate doors; understand them and Git stops feeling random.
Conflicts are Git asking a human to choose between two edits, not a catastrophe.
reset --soft un-commits, revert un-does pushed commits safely, stash shelves work in progress.
Small commits with verb-first messages make your history readable and your name trustworthy.
Never commit secrets; .gitignore is your first line of defense.
Your contribution graph and merged PRs are quiet, permanent proof of skill.
Conclusion
On our first internship morning, a mentor said “branch pe push kar dena, PR bana dena” and we nodded confidently while understanding roughly forty percent of that sentence. That evening, out of pure fear, we created a dummy repository and practiced the loop until it felt like brushing teeth. Fear was a fine teacher, but you now have a better one: a finished loop, your own merged pull request, and a map of every place beginners usually fall.
Remember the lost mini-project from the beginning of this guide? The one that died inside a corrupted zip file at 2 AM? Nothing like that can ever happen to you again. Every meaningful state of your work now exists as a commit, every experiment lives on a branch, and every team decision lives in a pull request thread. That is not just tooling. That is professional safety.
Git does not make you a good developer. But every good developer you will ever meet speaks Git fluently, because it is how teams remember.
So keep the practice repository alive. Add a page this week, open a silly PR, merge it, watch the green square appear. Then do it again on a real project, because the distance between “I know Git” and “I use Git” is exactly ten minutes of daily practice.
Thank you for building with us. If this guide turned a scary terminal into a familiar tool, share it with the friend who still emails zip files to teammates. And if you want this exact workflow reviewed by mentors on real client-style briefs, our Web Development internship track runs on it every single week. — Harsh Mishra, APNOAI Team